DS4: Template: Links & Menus (link)
With the links and menus you can indicate per segment in the template whether you want to link it to a page, app or other (external) link. You can also indicate whether this segment should be given the option of a drop-down menu, so that the customer can set this in Ziber Team. Optionally, you can also create the dropdow items directly.
Link a button (segment) to a page, app or other URL (external)
Link to an existing page or app
- Click on the segment you want to link to
- Select the desired link in the settings from the menu. For example 'Pages - Home'
Link to a new (not yet existing) page
- Click on the segment you want to link to
- Click on the menu in the settings and type the name of the page you want to create. For example 'About us'
- Press 'enter' or choose with 'Create page: About us'
Link to an external URL
- Click on the segment you want to link to
- Click on the menu in the settings and type the name of the URL you want to create. For example 'www.ziber.nl'
- The URL is automatically recognized.
- Click 'enter' or choose 'URL'
- Then choose whether the URL will open in a new or existing window.
- Link buttons to a drop-down menu
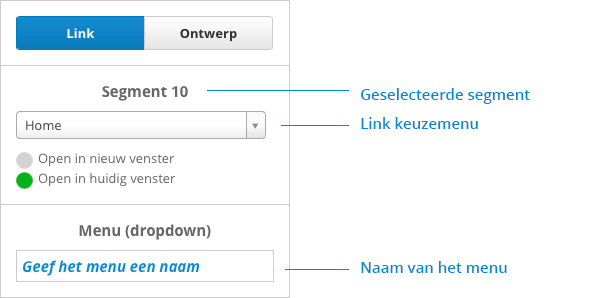
figure 1
Link a button (segment) to a dropdown menu
You can expand a button with a dropdown menu. The contents of the menu can be created directly in DS4 and can also be changed by the customer in Ziber Team.
Name a drop-down menu
The name (or label) of the menu is important because the customer will see this name in Ziber Team when changing a drop-down menu. By giving the menu a clear name, the customer can easily find the correct menu.
Add items to the drop-down menu
Directly below the segment you will see an input field with the text 'Give name to menu button'. Replace this text with the text of the button. This text becomes visible to the visitor in the drop-down menu on the website. The button menu text can also be changed by the customer in Ziber Team.
- Type the name of the button in the input field
- Click on the '+' icon or press 'enter'
- Complete the menu with multiple buttons if necessary
Add a submenu to the dropdown menu
- First, add a button to the top-level drop-down menu
- Click again on the button to which you want to add a submenu
- Click on the '+' sign
- An extra menu is added to the button on the right side.
- Enter the name of the first button and click on the '+' icon or 'enter'
- Complete the submenu with several buttons if necessary
Organize the buttons of the drop-down menu
You can change the order of the drop-down menu and submenu in order
- Move the mouse over the order icon (see figure 2) of the button you want to change
- Click and drag the button up or down to the desired position
Remove a button from the drop-down menu
- Select the button you want to remove
- Click on the delete icon (see figure 2) to delete the button immediately
NB If there is a submenu linked to the button, this will also be removed immediately. You cannot undo this.
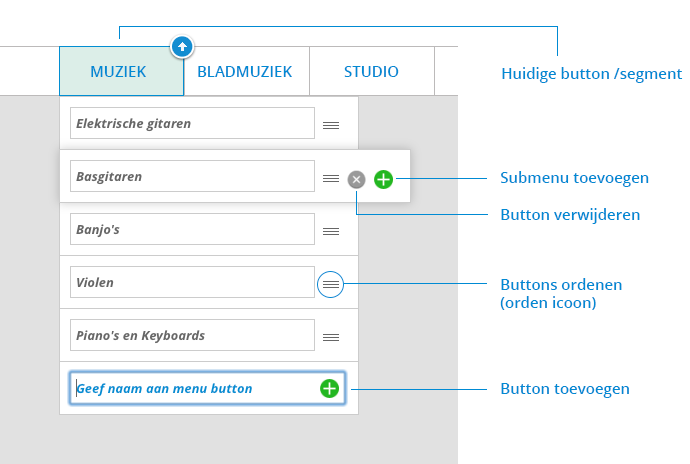
figure 2